MySQL Connector and Web-Interface for DX Spider

DXSpider is Copyright © 1998-2007 by Dirk Koopman G1TLH. http://www.dxcluster.org

Purpose:

The purpose of the script is to extract the DXSpots from the DXSpider data files and write them into a MySQL database. This gives the facility of interfacing to the spots in many ways, mainly from a web interface, which was the main reason for developing this script.

MySQL offers a fast and query-based database that can also be accessed from logbook programs ect.

Prerequisites:

  • Linux Operating System (Will probably work on Windows also)
  • DXSpider
  • Apache 2.2
  • MySQL 5
  • PHP5

Create the database schema:

mysql> CREATE DATABASE `dxcluster` ;

Create the tables:

CREATE TABLE `dxcluster`.`spots` (

`freq` DOUBLE( 12, 3 ) UNSIGNED NOT NULL ,
`dxcall` VARCHAR( 85 ) NOT NULL ,
`datetime` VARCHAR( 85 ) NOT NULL ,
`commets` VARCHAR( 100 ) NULL ,
`spotter` VARCHAR( 85 ) NOT NULL

) ENGINE = MYISAM

Now we create the scripts for datacollection:

Create a file called start.txt and newspots.dat

touch start.txt

touch newspots.dat

Now create a file called dxmysql.sh and insert the following:

i=$(cat /spider/data/spots/2008/start.txt)

doy=`date +%j`

v=`cat /spider/data/spots/2008/$doy.dat |wc -l`

sed -n "$i,$v p" /spider/data/spots/2008/$doy.dat > /spider/data/spots/2008/newspots.dat

let "v++"

echo $v > /spider/data/spots/2008/start.txt

mysql -u <mysqlusername> -p<mysqlpassword> -e "load data infile '/spider/data/spots/2008/newspots.dat' into table dxcluster.spots fields terminated by '^' lines terminated by '\n';"

Now create a cron job (/etc/crontab) as follows:

0 0 * * * root echo "1" > /spider/data/spots/2008/start.txt

* * * * * root /spider/data/spots/2008/dxmysql.sh > /dev/null

Please ensure that the DXSpider server is set to use UTC as timezone.

Upload the PHP scripts to your /var/www directory

You only need to edit the file clusterdb.inc.php to set your MySQL user and pass.

Now access http://your_site/cluster.php

This software is provided as-is and comes with no guarantees. It is provided under the Creative Commons licence. Please visit http://creativecommons.org/licenses/GPL/2.0/ for more details.

Please leave the “Powered by 9H1LO DX Engine” and link to www.9h1lo.net on the html pages.

New update for 2010. The dxmysql.sh script has been updated to support auto year change:

#!/bin/bash
year=`date +%Y`
i=$(cat /spider/data/spots/$year/start.txt)
doy=`date +%j`
v=`cat /spider/data/spots/$year/$doy.dat |wc -l`
sed -n "$i,$v p" /spider/data/spots/$year/$doy.dat > /spider/data/spots/$year/newspots.dat
let "v++"
echo $v > /spider/data/spots/$year/start.txt
mysql -u <USER> -p<PASS> -h <HOST> -e "load data local infile '/spider/data/spots/$year/newspots.dat' into table dxcluster.spots fields terminated by '^' lines terminated by '\n';"

12GHz Division by 8 prescaler

This design uses the Hittie HMC363 prescaler chip.

It divides the input by 8 so if 10GHz is put in the input the output is 1.25GHz.

Component assy:
To fit the ERA-1, (or NBB-310 for higher frequency performance)
Drill a hole to allow the body of the device to drop down thru the pcb
so the leads are level with the tracks
Snip off the leads to make them about 1mm long
Fit “u” shaped copper strips thru the hole to connect the ground pads to the back plane
Then fit the device, white dot/angled lead is input. I used silver loaded solder paste

To fit the Hittite prescaler
Put a small blob of solder/solder paste under the device and align it.
Solder one corner lead to its pad to locate the device
Apply heat to the adjacent ground pad to melt the solder under the device
Ensure that it has settled down on the ground pad before removing heat.
(I applied heat alternately each end to ensure that it was firmly stuck.)
Solder the rest of the leads to the pads.

When you’re testing it, just apply a finger (grounded, of course) to the top of the package to check the temperature – if it feels hot – it probably isn’t grounded properly. It will be dissipating around 360mW and the ground pad will be a useful mechanism for dissipating the heat.

1.2GHz MMIC Amplifer using AH-1 MMIC

This amplifier can be used as a driver for a PA module or as PA by itself.

10dBm (10mW) input should give about 23dBm (200mW) output.

It is constructed on standard double sided FR-4 board and supply is 12v.

Higher Gain Version

This high gain amplifier will provide 23dBm output across the 23cm band. It is designed to be
driven directly from a VCO or mixer stage and will drive a Mitsubishi RA18H1213G to full output
power. An 10dB input attenuater can be added to allow for 0dBm input.

The driver stage is a Mini Circuits ERA-5 MMIC which provides about 20dBG at 1.2GHz. The main
amplifier is a WJ AH-1 MMIC with 13dBG and a high P1 if 23dBm.
The components apart from the 56ohm bias resistor, are all mounted on the top side of the board.
The bottom side is left as ground. Input and output connectors are SMA type.

DDS Based QRSS Beacon

Based on the design by Matteo Campanella, IZ2EEQ who’s article appeared in QEX Magazine.

Lots of inspiration and support from Colin G6AVK and the QRSS Knights Group.

It is based around an Analog Devices AD9851 DDS and a PIC16F628. I designed the PCB using Eagle.

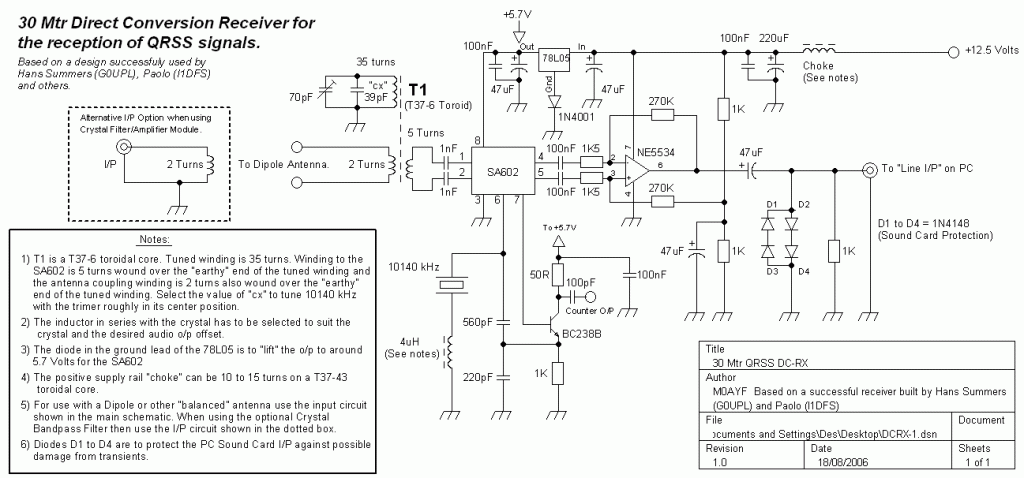
30m QRSS Receiver

This receiver designed for 10.140MHz. It is intended to be used for Slow Morse (QRSS) reception.

Click to enlarge
Component Layout

30m QRSS Beacon Transmitter

This beacon puts out about 0.5W on 10.140MHz. It is intended to be used for Slow Morse (QRSS) operation.
The actual design is by Colin G6AVK and PCB by 9H1LO.
The varicap is a normal 3mm red LED. Transistors can be 2N2222 or 2N3904, PA final 2N3866 or 2N4427.

Oscillator Components Placement
PA Components Placement

HF Frequency Locked Loop by IK3OIL

This design by IK3OIL has been quite popular, especially used as BITX VFO. Some Indian hams have also created a kit from these designs.

Boards mounted in tin plate enclosure

16×1 LCD Display

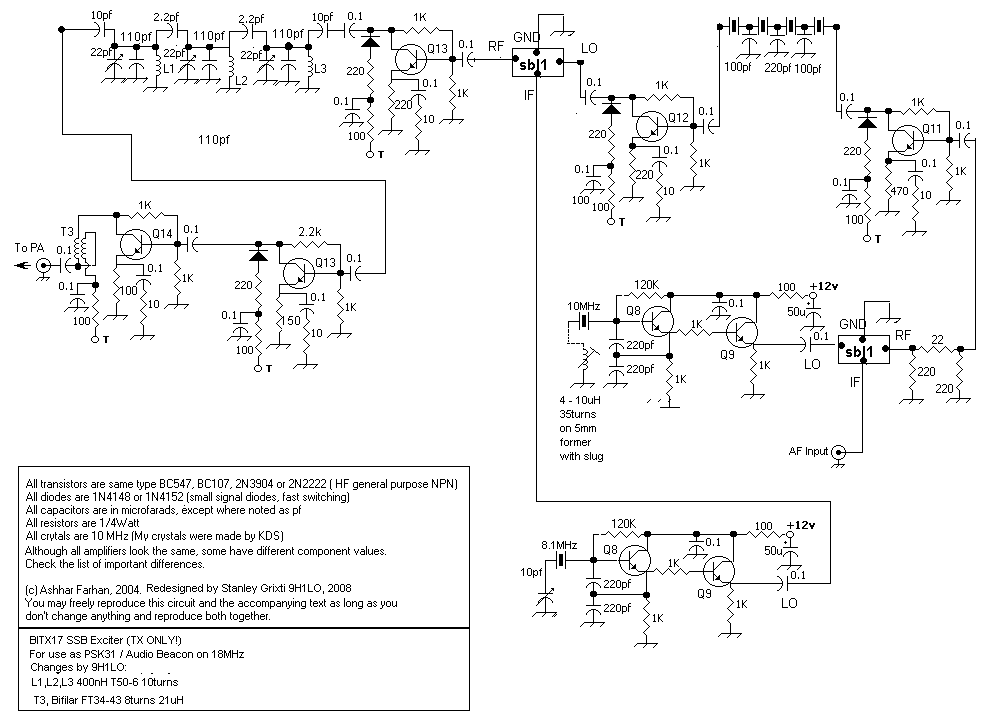
17m SSB exciter based on BITX-20

This is the SSB exciter used in the 17m 9H1LO/B PSK31 (USB) beacon.